Monday, December 23, 2013

Simple Ornaments- Merry Christmas!

Hi Everyone,
      2 days to go and it's Christmas and I wish you all a wonderful holidays! I made a quick ornaments display that you can use as garland or for display for your Christmas tree. The stuffing that I used inside were from my stash that I haven't touch for a while. So it's nice to see some of my stash being able to use for something. I hope you enjoy!
If you want to see on how I created these ornaments:Click Here

Thanks for stopping by!
Hugs Jas

Friday, December 20, 2013

Christmas Project Series 12th of 12th - Christmas Art Canvas Layout

Hey Everyone,
             My last project for this year and this is my 12th Christmas Project Series. It's Christmas Art Canvas Layout another gift idea. I enjoyed creating this layout and was really happy on how it turned out. I hope you all enjoyed my Christmas Project Series 1-12 that I made. It was really fun and I hope I can come up with something fun again. May we all have a wonderful Christmas and blessed New Year! Looking forward to 2014!

 If you like to see on how I created this canvas: Click Here


Materials that I used for this project:
My Mind's Eye paper pad - Santa Claus
Canvas - 11"x14"
Prima paper pad - Lyric
Tacky glue
Memento- London fog
Chandelier stamp - Prima
Walnut Stain - Distress ink
Distressing tool
Doilies
Post card stamp - Tim holtz
Memory box die - Window panels
Recollections - Embellishments
Joann's fabric lace
MFT die-namics dies
Quickutz die
Water color paper
Pearl trim
Tulle, chiffon, net nylon
Handmade flower
Wild Orchid Crafts flowers and leaves
Aluminum roses
Kaisercraft sentiment stamp
Prima wood embellishment
Rhinestones
Perfect pearls- gold and water


Thank you for stopping by!
Hugs Jas


Wednesday, December 18, 2013

Christmas Project Series 11 of 12 - Altered 7gypsies Tray

Hey Crafters,
Here's my Christmas Project Series 11th of 12th. This time I created an altered tray using the 7gypsies tray. I had to cover up the pictures for privacy and this tray is really awesome for gift idea. 
The picture doesn't give the justice on how pretty this look in person. Anyhoo, I have a video on how I created this tray if you're interested - Click here I hope you enjoy this project.


Materials that I used for this project:
7gypsies tray
My mind's eye - Breeze
Walnut stain - distress ink
ATG
Embellishments/Recollections- Pearl trim, Lace trim, handmade flowers, Wild Orchid flowers and leaves, Pearls, Rhinestones.
Martha stewart punches (Butterflies)
Metal Label
Clear stamps- Inkadinkado, My Mind's eye, Ali Edwards
Wood embellishment - Prima
Aluminum flowers
Key - Michaels

Thanks, for stopping by!
Hugs Jas

Saturday, December 14, 2013

Plain, Basic & Expandable Paper bag mini album - Christmas Project Series 10 of 12

Hey Everyone,
 Only 11 days to go before Christmas! I'm done with my xmas shopping but I'm not done wrapping them. Time is flying by so fast and I just can't believe that we're near 2014! Anyhoo, here's my Christmas Project Series 10 of 12 a paper bag mini album. I made it simple and very basic, I didn't embellish the inside because I want to have the picture when I start embellishing it. You can expand this mini album easily and as bulky as you want it to be. Again very easy to make for your hectic schedule, enjoy!

If you want to see on how I created this paper bag mini album: Click here


Materials that I used for this project:

My Mind's Eye paper pad - Santa Claus
Recollections embellishments
Binding rings
Tacky glue, ATG
MFT die-namics
Black small paper bag - Celabration
Chipboard
Black Cardstock
Doily
Black soot - Distress ink
Huge Eyelets

Thank you for stopping by!
Hugs Jas


Sunday, December 8, 2013

Christmas Project Series 9 of 12 - CAS using Saturated Canary

Hey Crafters,
     It's CAS Clean and Simple Card today for my 9th of 12th Xmas Project Series. I used the lovely Violet Vintage by Krista Smith (Saturated Canary). Love that you can use a bunch of scraps and make this card another mass produce, right!? You can find out the details of this fabulous card on my YT channel. I hope you enjoy!

 If you're interested on how I created this card: Click here


Materials that I used for this project:

Papertrey ink paper - White
Copics
Versafine ink
Digi stamp image from Saturated Canary : http://saturated-canary.myshopify.com/products/violet-vintage
Bo bunny paper - Blitzen collection
corner chomper
Hero arts - warmest wishes sentiments stamp set

Thank you for stopping by!
Hugs Jas

Friday, December 6, 2013

Christmas Project Series 8 of 12 - Christmas Card

Hey Crafters,
            Here's my Christmas Card for my series 8 of 12. This one can also be mass produce very simple card so easy to make. I hope you enjoy this one.

If you want to see on how I created this card: Click here


Materials that I used for this project:
Papertrey ink White paper
Mft die-namics
Hero arts Holiday sentiments
EK success border punch
Martha S. -Glitter Gold
Adhesives Scor tape/Foam tape
ATG
Tacky glue
Embossing folder Swiss dots
Patterned Paper - Bo bunny (Blitzen Collection)
Prima Wood Embellishments

Thank you for stopping by!
Hugs Jas

Wednesday, December 4, 2013

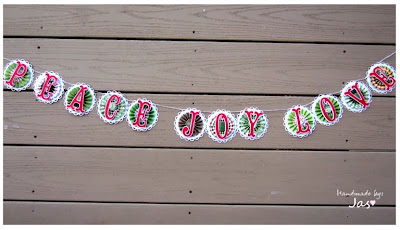
Christmas Project Series 7 of 12 - Peace Joy Love Garland

Hey Everyone,
          Christmas is really fast approaching, it's only 21 days to go and I just started my Christmas shopping. I bet most of you are done shopping, this year I'm late doing my shopping because a lot of things are happening and my kids are in school so mostly I focus on them of course family first! I'm happy to say I just need a few gifts to make and to buy. I hope I will be done soon and so onto my project. I made this garland and I hope you enjoy it as always I have a video on how I created this garland. So please check it out it's very easy! Click here


Materials that I used for this project:

Tim Holtz mini rosettes die
R114 Christmas Background
Spellbinder dies - Lacey scalloped circle
Story book cartridge - Cricut
Old Christmas paper 
Bazzill Red/White Cardstock
Memento Rich Coccoa
Tacky Glue
Jenni Bowlin ink - Brown sugar
Bakers Twine

Thanks for stopping by!
Hugs Jas

Monday, December 2, 2013

Christmas Project Series 6 of 12 - One Layer Card

Hey Everyone,
       Wow, we have 24 days to go before Christmas and here's number Six on my Christmas Series.  A one layer card this is something that you will have in your craft room, pretty sure you have letter stamps. You can create your own and have fun with it. Simple and also can be mass produce. You can do this in any occasions as well. I hope you enjoy.

If you want to see on how I created this card: Click Here


Materials that I used for this project:
Water color paper 140lb. (Love this paper really good for the base and good for mix media)
Card base : A2 size
Old stamp set sorry...
Jenni Bowlin inks: Seed pocket, Cough Syrup,
Sizzix Embossing folder TH
Perfect pearls and water (love to use it for enough shimmer)
Heating tool

Thanks for stopping by!
Hug Jas

Thursday, November 28, 2013

Christmas Project Series 5 of 12 - Gift Card/Money Holder


Hey Everyone,
                     HAPPY THANKSGIVING TO YOU ALL! 
Here's my 5th Christmas Project Series for you guys. This one is a Gift Card Holder/Money Holder. I love this one and the zipper border die that I used here is so versatile. You can pretty much make any size up to 7 1/2" (length). I hope you enjoy this one as well.

If you want to see on how I created this Gift Card/Money Holder : Click here


Materials that I used for this project:
Size of the gift card- 3"x8"
Papertrey ink 110lb Paper
Holiday Inkadinkado stamps - (No label sorry- old stamps)
Sentiments from Hero arts Holiday stamps set
 Papertrey Ink : Zipper Border Die
Big shot Machine
The Greeting Farm stamp set - Holiday Blessings-  Holiday Blessings clear stamp set

Copics - R39,R29, YG47, G05,
Gelly Roll Pen - Clear
ATG
Memento ink - Tuxedo Black
Archival ink - black
Clear Stamps from(OPEN ME)  MFT- DC Tag, You're It - Open Me- sentiment

Walnut stain - Distress ink
Jenni bowlin ink - Seed packet

Thanks for stopping by!
Hugs Jas

Tuesday, November 26, 2013

Christmas Project Series 4 of 12 - Mass Produce Card


Hey Crafters,
    Here's my 4th Christmas Project Series. This card that I made is for some of you who doesn't have time and you wanted to do something special but in a quick way. I hope you guys enjoy!

Here's the link if you wanted to see on how I created this project:


Materials that I used for this project:
Card size: A2
Papertrey ink paper 110lb.
R114 Christmas Background - Stampendous
Inkadinkado clear stamp
Hero arts sentiments: CL343
Embossing powder Zing Gold
Embossing powder Red
Jenni Bowlin ink: Stick Candy
Heating tool
Distress ink: Crushe olive, Frayed burlap, Walnut stain
Bazzil Cardstock: Red
ATG
EK success punch

Thank you for stopping by!
Hugs Jas

Sunday, November 24, 2013

Christmas Project Series 3 of 12 - Xmas Vintage Style Tag

Hey Crafters,
      Day 3 of my Christmas Series and this one I made a Vintage Style Tag. I made this just one layer and another simple idea for you guys. I hope you like this one :)

If you want to see on how I created this project:Click here


Materials that I used for this project:
Manila cardstock
Sizzix Tim Holtz die: Tag bookplates
Inkadinkado xmas clear stamps (Sorry, did not save the label for this one)
Perfect Medium ink
Clear Embossing powder
Heating tool
Distress ink: Walnut Stain, Frayed Burlap, Faded Jeans,
Weathered wood, Barn Door, Crushed Olive.
Archival Ink: Black Jet
Perfect Medium: Gold
Distressing tool
Recycled box
Tacky glue
Distressing tool
Scissor
Acrylic paint Adirondak: Gold
Variety of Stamps
Fibers

Thank you for stopping by!
Hugs Jas

Friday, November 22, 2013

Christmas Project Series 2 of 12 - Xmas Banner

Hey Crafters,
         Here's the second series of my Xmas Project 2013. I made a banner this time and very simple easy to make. I hope you enjoy!

If you would like to see on how I created this project:
Click here


Materials that I used for this project:

Rubber Stamp RI44Christmas Background - Stampendous
Cricut Cartridge Story book
Each letter size: 2 1/2" Height
Bazzil Cardstock: Red and White
Kraft Cardstock: Recollections
Mft die-namics: Jumbo Fish tail
Memento Ink: Rich Coccoa
Jenni Bowlin ink: Brown Sugar
Tacky Glue
Doilies 4" diameter
Cropadile
ATG
Bakers Twine

Thanks for stopping by!
Hugs Jas

Wednesday, November 20, 2013

Christmas Project Series 1 of 12 - Vintage Style Card

Hey Everyone,
          I'm doing a 12 Christmas Project Series this year. More cards and a little bit of other stuff that I'm gonna be showing. I hope you guys like all of them and the first one that I will be posting is a Vintage style card. Enjoy!

Here's the link to my video for this project: Click here


Materials that I used for this projects are:

Kraft Paper - Recollections
Red Cardstock - Bazzill
Doily
Patterned paper - Prima (North Country)
Mft die-namics -  Jumbo Fish Tail
Mft die-namics - Spring wreath
Adhesives
Jenni Bowlin ink -Brown sugar
Perfect medium
White Embossing powder
Heating tool
My Studio paint - white
Sequins - Gold and Red
Glossy Accents
Gelly Roll Pen - White
3D Fabric Paint - White

Thank you for stopping by!
Hugs Jas

Friday, November 15, 2013

Handmade cards for sale to donate to Typhoon Yolanda victims- Please help.

Hey Everyone,
UPDATE: Here's the link to where I donated the money that I gather from selling my handmade cards. To my Family and Friends THANK YOU for your help and made this possible.
CLICK HERE
HAPPY THANKSGIVING!
Please, help the victims of Typhoon Yolanda Philippines. Starting November 16, 2013 - All of the money that I'm going to make by selling all of my 20 HANDMADE CARDS that are listed on my shop are going to the victims of Typhoon Yolanda. I will donate the money and share the receipt or proof that I donated the money through my facebook page:


Here's the link to my shop: EndlessCreationbyJas - Etsy shop 

THANK YOU SO MUCH FOR ALL YOUR HELP. 
HUGS JAS

Saturday, October 19, 2013

Noah's Ark Easel Card - Soo stinkin cute!


Hey Everyone,
    A Noah's Ark Easel Card share today! I know...so stinkin' cute, right?! When I saw this stamp, I fell in love right away and I knew what to do with it. Here it is and also I was able to filmed it while creating it. Just putting the card together not the coloring part. Anyhoo, looove this card and especially their jiggly eyes! I paper pieced the images and I tried to make it look 3D and I'm happy on how it turned out.

If you want to see on how I created this card: Click here

Here are the materials that I used for this card:
Stamp Image - Woodware Craft Collection (Noah's Ark)
My Favorite Things - Kraft Cardstock & Die-Namics
Georgia Pacific - White Cardstock
Adhesives
Rhinestones
Jiggly/Googly Eyes
Paper - My Mind's Eye (Fine and Dandy)
Paper - Echo Park (Hello Summer)
Fabric Net Nylon
Letter Beads
Doily
Copics


I hope you enjoy this easel card and thank you for stopping by.
Hugs Jas

Saturday, October 5, 2013

FAMILY - Altered Printers Tray #3

Hey Crafters,
       I'm back with another project to share with you. I have another Printers Tray that I altered for my sister.  I wanted to give her something special and close to her heart for her birthday. This is what I came up with and I really hope that she likes it.

  As always I had fun creating this and it's really easy to make. Sorry, I had to put hearts on their faces for privacy. I used the paper Lyric from Prima,  love that paper so glad I purchased an A4 too. The embellishments that I used were from Wild Orchid Crafts and Recollections. I also used some dies from different brand like MFT and Spellbinders. Of course I have to use my Martha S. butterflies punch.  I hope you like this altered tray that I created.

If you would like to see this in video: Click here

Thanks for stopping by!
Hugs Jas

Tuesday, October 1, 2013

Fall- Thank you Circle Card set

Hey Everyone,
    
Wow, September is already over...how time flies! Fall season is here and I have a fall circle card to share with you today, it's very easy to make. All you need is two different cardstock and any fall stamp then fussy cut it to make it dimensional or just stamp it on the front of your card and then just add embellish on top and add sentiment then it's done.  I hope you like these cards that I made.

Here's the link if you want to see on how I created it: Click here


Thank you for stopping by.
Hugs Jas

Material that I used for this project:

-Kraft Recollections card stock
-White Bazzill textured cardstock
-Inkadinkado Fall stamp set
-Thank you sentiment - Hero arts
-Tim holtz distress inks (Mustard seed, Barn door,
 Spiced Marmalade, Walnut stain)
-MFT die-namics - Rolled roses
-Spellbinder Lacy circle die
-MFT die-namics - Circle 1&2
-Bakers Twine
-Adhesives
-Scissors
-Big shot
-Glue gun or Glossy accent
Friday, September 20, 2013

FUN Feather Stamping Ideas using Hero arts clear stamps

Hey Everyone,
      I wanted to share these cards that I made using just one FEATHER stamp image. I had a little bit of fun and created different ideas on how to use this one Feather stamp image. I have a tutorial on my YT channel on how I created these three cute simple cards. Or just by looking at the pictures it's not hard to follow on how I created each card. I hope you enjoy these cards for today. The Stamp Feather image that I used was from Hero arts. I purchased this a long time ago and it came with three more different kinds of clear stamps feathers.

If you want to see on how I created these cards: Watch here

Line up Feathers

Flower Feathers

Friendship Feathers

As always thanks for stopping by!
Hugs Jas


Tuesday, September 17, 2013

Simple Mini Album- using Pink Paislee Butterfly Garden

Hey Crafters, 
 I just have a simple mini to share with you today. I used the paper from Pink Paislee Butterfly Garden. Love this paper and I wish I have more, lol! Also, some die cuts from MFT (My Favorite Things) and embellishments from Recollections and WOC (Wild Orchid Crafts) and some lace trims and tulles from my stash. I used the Tim Holtz Valise die to make the mini and with the medium chipboard. This mini you can add atleast 17 photos and added magnets for closures on some of the flip pages that I made. I hope you like this mini that I made :)

You can check it out here to see this mini on a video: Click here

Thank you for stopping by! 
Hugs Jas

Saturday, September 14, 2013

SMOKIN' HOT - using Saturated Canary - Coloring video tutorial


Hey Crafters,
     I hope your weekend is in a good start. Mine is a little bit off, hehehe... I have a video to share and this one is to show you how I colored the digi stamp image from Saturated Canary. Unfortunately,  no background music I don't know what's going on with the Youtube Audio? I usually use that to create a background music to all of my videos but for some reason it won't work since last night...so frustrating sometimes. Anyhow, I hope you guys still enjoy this speedy video on how I colored this image.


Thanks for stopping by!
Hugs Jas

Copics that I used for this image:

Skin: E00, E02, E11, E13, E50, R20
Lips: R20, R29
Two piece: R14, R24, R29, R39
Ice cream: RV34, RV10
Cone: E57, E59, E31
Hair: E42, E43, E44, E47

Have a nice weekend!

Saturday, August 31, 2013

Home Sweet Home - using NEW Gorjuss girls stamp

Hey Crafters,

            I hope everyone are doing fabulous. I'm back and it's been awhile and my mojo slowly coming back, yay! I made a canvas layout and this one I imagined it in my head and managed to make sketch and create it.  I have a video to share on how I created this project. You will see my funny sketch there and sometimes that's how I usually start my project. Also I was inspired to make something because I reached 2K subscribers on Youtube, yay! Thank you to my YT subscribers and also to my followers here, love y'all! I love to inspire people and also to be inspired that's why our crafting world is so much fun and very addicting! I hope you enjoy this project as much as I did. I wasn't going to post this yet I'm trying to edit the video still but I just could not wait to share this lovely project with you, enjoy! (The video is ready)
If you want to see on how I created this layout: Click here

Here are the crafts stuff that I used in this project:
Canvas 6x8
Bo bunny -Gabrielle Collection
Memory box die - Grand Madison Window Poppy - (This one was given to me by my blog friend)
Tim holtz edge die- Butterflight
Martha S. Butterfly punch
Embellishments from Recollections
White Net Nylon
Wild Orchid Crafts Flowers
Gorjuss Girls Urban Rubber stamp - You brought me love 
Jenni Bowlin ink - Brown Sugar
Sentiment was from MME 
Perfect pearls- Gold
Adhesives
Mod Podge
Distressing tool
Scissor

Thank you for stopping by!
Hugs Jas


Thursday, August 29, 2013

Bo Bunny Etcetera - Mini Shaped Album

Hey Crafters,
     Yesterday, I posted about haul vids can't get over the sale on MFT it was awesome! Anyhoo, today I wanted to share with you a mini album that I made for someone. I need to incorporate Boston and San Francisco in this mini. But I couldn't find much of embellishments or charms that represents the states so I had to stick with the stickers and printed some online.

Anyhoo, here are the photos with each pages that I made. I used Sizzix/Tim holtz dies in this mini. Embellishments were from Recollections. I had fun putting this mini together and I hope you like it.


Thanks for stopping by!
Hugs Jas

Tuesday, August 27, 2013

Another haul, oh yeah! -My Favorite Things Huge Sale :)

Hey Everyone,

       Guess what, MFT's having a sale 50-75% off discount on some of their dies and stamps! As you can see I went cray cray about the sale and mind you it feels like early xmas when this package came today :) Go check their site, you might find some dies or stamps that you don't have yet. Sometimes it pays off when you wait for the right time to come and this is it for me, lol! I cannot wait to play with these and  now I have to figure out on how to store my dies. My binder that I used to store my dies is really full and I think it's time to think of a new storage. What you think?
 

Happy Crafting!
Hugs Jas

Tuesday, August 20, 2013

Make a Wish - Simple but fun card :)

Hello Everyone,
    Surprise, surprise I have a card for you tonight and also a video for you on how I created this cute simple card. Very simple but fun card, you just need to find a nice image and add a fun color to it and make the background simple so the image will pop nicely. I hope you like this card and enjoy.

Here's the link for this tutorial: Click here


Thank you for stopping by!
Hugs Jas

Thursday, August 15, 2013

Coloring Cupcakes using Copics#11 - Video clip

Hey Everyone,

I just want to share this video of me coloring Cupcakes using Copics. I used the CUPCAKES by Spellbinders. Also, here are the copic markers that I used:
V06,V15,V12 - (Purple)
RV10,R20 - (Pink)
BG13, BG10 - (Teal)
Y11,Y10 - (Yellow)
R29,R39 - (Red)
G05, YG03 - (Green)
E55,E47 - (Brown)
W1,W3, 0, Sakura gelly pen in clear
3D fabric (Tulip slick) Brown

Paper that I used: White from Papertrey ink.


ENJOY!
 

Monday, August 5, 2013

Mojo is not back so sharing my scrapbook haul, enjoy!

Hey Everyone,
     I just want to say hello to all of you. I'm trying to get my mojo back and hoping will be back
before the school starts. My eldest is going to Kindergarten and my youngest is will be in Pre-school. I don't know how I'm going to feel when both of them are in school. But this is how it supposed to be they have to go to school, right. Well, since I'm not making anything or should I say since my mojo left me,  I thought I'd share with you my scrapbook haul. Oh yeah, I'm pretty active when it comes to buying scrapbook stuff online hehehe. I must say that this year I did good, I mean I can control myself. I have to think really hard if I really need the stuff or not and a lot of searching on where I can get it cheaper. You know how it works, lol!

Anyway, here's the link to my scrapbook haul video I hope you enjoy!
Related Posts Plugin for WordPress, Blogger...