Friday, January 27, 2012

Boy and Girl - altered 7 Gypsies Printers Tray Projects

Hey Everyone,
      I have altered projects to share with you today. Today is a special day because it’s my other half’s birthday. These are one of the gifts that I gave him this morning.  I altered these 7 gypsies Printers tray with our kids’ pictures in each tray and I used Recollections and MME patterned paper. My first time altering and I had fun creating these. If you are first timer to alter something I recommend you should try to alter 7 gypsies Printers tray. It’s already painted and you just have to add patterned paper, pictures and embellishments.  Easy to create and the outcome is fabulous.  I hope I inspire you to create something like these. Enjoy!


Click HERE if you want to see the video.


Have a terrific night!
Hugs, Jas

Monday, January 23, 2012

The Lady in the Tower - TGF Customer Challenge " A Night at the Bookstore"

Hey Everyone,


      I'm so glad that I will be able to participate on the TGF Challenge The theme was "A Night at the Bookstore". I was so busy (personal stuff) on the day of the chit chat so bummed that I wasn't able to participate L But I’m glad that I made it to the TGF Challenge instead. So here’s my take I made a book card and my Categories fits in this challenge - Favorite Book (keywords: TGFCCN2, thegreetingfarm)


One of my favorite book was “The Lady in the Tower” She’s Queen Anne Boleyn, one of the wives of Henry the VIII. Their love story is very wild and scary. She likes to play mind games with the king and she was beheaded after three years of marriage. It was really good book by Jean Plaidy. The passion, the intensity the author captured it all.


 I used the lovely Princess Anya no.2, I colored her skin and hair with my copics and then paper pieced her dress and crown with the graphic 45 patterned paper. I used Renaissance Fair by Graphic 45 paper for all the background. Then I added lace trims, rhinestones and flowers. I hope you like what I did for this challenge.

To see this project on a video click HERE


Thank you for stopping by! Hugs, Jas

I'm entering this project to the following:

Here's the book cover if you're interested:

Sunday, January 22, 2012

Baby Girl Mini Album #2


Hi Everyone,
I'm here to share a baby girl mini album #2. I made this for someone and she wanted something similar to my first one that I made Sweet Baby Mini Album. I used S.E.I papers these papers doesn't come with the sentiments. So I have to create my own using my stamps that has to do with baby. I really like making shaped mini album. Also, I left the front page blank I will add the name later.  So here's the mini album, enjoy!

Check out the video of this mini album: My Baby Girl Mini Album #2


Happy Sunday Everyone!
Hugs, Jas

Sunday, January 15, 2012

My Fairy Princess card

Hey Everyone,

           I'm glad to be back again with beautiful card to share with you. This time I used Wee Stamps and the image is called Silver Fairy designed by  Sylvia Zet . I've wanted to color her since I got her sometime ago, I just didn't get a chance. But finally last night I was able to color her up and everything came to place. So to start I colored her with my copics but mostly I used nude colors as you can see here. I was experimenting with the colors and really happy with the result. If you ask me what are the names or numbers of copic markers I used I don’t remember, lol!  I used my sakura gel pen for her wings to add some sparkles. I was trying to do monochromatic theme but for some reason I ended up with this, lol! I left the top right blank because I'm reserving it for the sentiment that I'm going to end up choosing, which at that time of creating this card I can't make up my mind. So I decided to leave it just like that for now. When I need it for something then I will definitely add sentiment. For the background paper I used pink paislee Butterfly Garden. For the embellishments I just added some flat pearl beads, flowers, doilie and trim. The background for the Fairy I created the same technique on my previous project. For the finish touch, I used my distress inks mostly on every piece of papers that you see here. So that’s how I created this card.

Here's the video on how I created this card: Click HERE


I hope you're having a wonderful Sunday!
Hugs, Jas
Saturday, January 14, 2012

Music lover...

Hey Everyone,
     Happy Saturday! I’m back with another Tag to share with you all. Just having fun with this so I decided to used Download Diva Kenny K. She loves music so I thought of creating music note background J I just love this, so simply beautiful.  I colored her with my copic markers and it reminded me to get more copics lol! I just used the same technique that I did on the first tag (stella). That’s it for now not much to say…I just hope you like what I created… till my next project, see yah!


Thank you for stopping by, appreciate it!
Have a nice day/night! Hugs, Jas


Friday, January 13, 2012

Are you ready for Valentine's day?


Hey Bloggers,
Friday already, time really flying by don't you think? Today, love is in the air, I used Stella from the The Greeting Farm. She's ready for Valentine's day as you can see I colored her red with my copic markers. Also, I used Blush Hello and Blush Heart for the background. Don't you love those stamps are so versatile, love it! I used Versamark ink for the background stamps and then used clear embossing powder. I distress all the sides surrounded Stella just enough to make it looks like she’s glowing.

FYI, you might notice her face has a stamped “hey” because I was experimenting and I purposely stamped the blush hello on the image as well. I thought I was going to use a clear embossing powder it wouldn’t affect the image as much and I wanted to see what it looks like too. Actually in person you wouldn’t notice it, just the way I took the picture that’s why it was so noticeable.  Anyway, I love how this tag turned out, it’s just sweet and lovely J

Click HERE to see how I created this tag, enjoy! 

I hope I inspire you to create something like this.


I'm entering this tag to the following challenge:

Saturday, January 7, 2012

Bon Voyage Mini Journal

Hello Everyone,
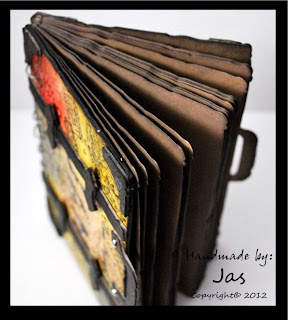
         Wow, it's already first weekend of January tiime really flies. I’m here to share the Bon Voyage Mini Journal that I made for a friend. I used the Tim holtz die Vintage Valise.  I started with chipboards and then used manila cardstock to cover the chipboards. Then I used different designs of stamps to make my own pattern paper.  After I’m satisfied with the design that I created I used my sizzix to dry embossed the manila cardstock. Then the fun part coloring the paper with my distress inks. Following with the tapping of embossing ink all over the background paper and then added UTEE powder and used my heating tool to heat set the paper and then I edged it with black ink. For the inside I used kraft cardstock papers and used my Vintage Valise die to match the cover of the journal. Then I just randomly stamped the side of each kraft cardstock with the images that I used on the front and back cover. I used jump rings to bind the journal. So that’s how I created this Mini Journal. I had fun making it and I hope I’ll be able to do some more of this kind of project. I hope you like this journal that I made.

Click HERE to see the Bon Voyage Mini Journal on video.


I hope you have a fabulous weekend!
Hugs, Jas♥

Tuesday, January 3, 2012

Ball Ornaments as a storage/display

Hey Everyone,
            I came across with the idea that I saw on Youtube mybutterflykisses12 and loved it! But the only thing is when I saw the video it was almost xmas time so I don’t have the time to make some Christmas ornaments. But still I went ahead to M’s to get some ornaments to use for next year. I got big ones and small flat ball ornaments. Also, I found some snow globes that you can make your own. So I grab those as well and all the xmas stuff at M’s are 70% off! What an awesome deal!  So went home happily with all the bargains that I purchased J

Then today I was organizing my felt flowers that I love to make and use for my daughter’s headbands, clips, or to sell at my etsy or as an embellishments for cards, layouts etc… I thought of the ornaments that I had recently purchased. So I took them out and began putting all the felt flowers inside. I love how it looks and so I decided to use it for storage for my embellishments instead and at the same time I can display it as well. It’s good for party favors as well if you put chocolates like kisses inside anything that has a wrapper on and as long as it will fit in and out it should be fine and not to heavy. The hanging base that I used was from Ikea I purchased few months back. It was actually for xmas decorations and I was gonna use it for that but I didn’t get a chance. But now I’m happy that it didn’t go to waste and finally be able to use it. So that’s my share for today and I hope you ladies like it!

      Here's my video if you want to check it out click: HERE

Thank you for stopping by! Hugs, Jas

Sunday, January 1, 2012

Wedding boxes samples

Hello Everyone,
        First of all, may we all have a prosperous new year! I need to make something on the beginning of the year so it will be a good start. I made some sample boxes for wedding to someone. The color is some what in the yellow family. So I hope this is close to the yellow that they're looking for. Since I made it might as well share them with you. Pretty simple designs and just added handmade flowers, tulle and doilie. Hope you like em' :)


Thanks for stopping by!
Hugs, Jas
Related Posts Plugin for WordPress, Blogger...