Wednesday, June 29, 2011

Grunge Mini Album- My very first handmade Mini album

Hey Everyone,
    Nice to be back after more than a week of MIA. I just finished my very first mini album, I love how it turned out! Like always, I'm excited when everytime I finished a project. So here it is it's a Grunge Shaped Mini Album. I used the Retro Grunge by Tim Holtz and adhere to the medium chipboard. Before that I used 12x12 medium chipboard and hand cut in to the lenght that I want. Then cut the patterned paper to the desired length and used my big shot with the Tim Holtz edge dies.  After that I edged it with acrylic paint dabber in copper color and then to finish it with a distress ink color Black soot. So that's how I made the base of the album. I really tried not to waste any left over scraps from that paper and medium chipboard so all the left over medium chipboard edges and papers I tried to incorporate them in a way that will fit the album. Then I added some embellishments like grungeboard minis (letter's, arrows, keys, locks etc...), MFT die-namics die (mini rolled roses), and I made some pockets and tags. Buttons and rings are from my stash. I'm really happy with this first mini album that I made, I used pretty much all the left over scraps from that paper stacks. To explain it a bit more check out my Youtube channel: craftgalore108. Here's the link for the video: http://www.youtube.com/watch?v=Ud5eVOrCAPo&feature=channel_video_title

                                                                    Enjoy and be inspired!

Materials used: (You don't have to have everything to create a mini album this is just an idea)

Medium chipboards
Patterned papers
Adhesives
Grunge minis by TH
Book plates
MFT Die-namics die (Mini Rolled Roses)
Acrylic paint
Distress Ink
Clear stamps
Embellishments
Big shot machine or Cuttlebug
Tim holtz Edge die
Ring binders


Thanks for visiting! hugs, Jas♥

Friday, June 17, 2011

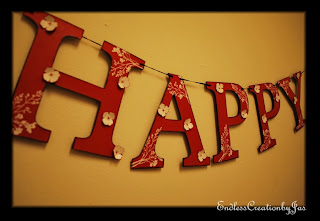
Happy Birthday -Cherry Blossoms theme Banner


Hey Everyone,
       I finally finished the banner that my sister had asked me to make for her but I have one more banner that I need to make for her. Anyway, this one that I finished making it's a HAPPY BIRTHDAY banner. I've been wanting to make something with a Cherry Blossoms designs so finally I got the chance to make one. I'm into Cherry Blossoms zone right now lol! So here it is and  I wanted to share with you all on how I made this banner. I really like how it turned out and I had fun making it. I hope she likes it =) I only took the HAPPY word for the picture to show, I'm sure you get the picture. Also, I'm not really happy about the quality of the picture because of the yellow lights that we have so I might change the photo tomorrow.

Here are the materials that I used to make the banner:
Cricut Machine (optional)
Cardstock
Adhesives
Mod podge
Embossing powder
Heating tool
Versamark ink
Scissor
Recycled cereal box
Ribbon trims (optional)
Distress Ink
Clear Stamp

I have made a video Youtube (craftgalore108) http://www.youtube.com/user/craftgalore108?feature=mhee  so you can see it there what it looks like rather than just a picture. Enjoy!


Double Gate Fold Card

Hello Everyone,

     I'm here to share my latest card that I just finished. Again this is for The Greeting Farm Royalty Contest Week Three. Here's the link for the contest if you're interested: http://splendidstamping.blogspot.com/

I will start on TGF stamp that I used. Princess no. 3...she's so adorable my new favorite =) I colored her hair, face and skin with Prismacolor pencils. I paper pieced her gown with the patterned paper and then I added clear glitters and glossy accents. Her crown I used fabric 3D paint in gold and the rest is Prismacolored pencil to match her gown. Also, I added a touch of gold fabric 3D paint on her ears to make it look like an earrings =) For the card, my base is white cardstock and then I added kraft cardstock and on top I used patterned paper. To embellish the card, I decided to put flowers on both side where the gate folds and in the middle of the card I followed the sketch by Jessica for the contest. I just added a little extras here and there. The white dots are from the 3D fabric paint, it's almost the same as stickles but the only thing is this one is thinner but cheaper =) To finish the card I added some white lace trims.

I made a video on how I created this Double Gate Fold Card. Here's the link: Craftgalore108-JAS YT channelMy main thing here is not how you can create the double gate fold card (I'm sure you've seen the video on how to create the Gate Fold Card already) ...I'm just giving you an idea on how you can decorate the card even more.

Here are the things that I used on making this card:
White Cardstock
Kraft Cardstock
Patterned Cardstock
Flowers
Trim beads
Fabric 3D paint - (Although it says fabric you can use it on paper and it's like stickles and cheap)
TGF stamp
Adhesives
Lace trim
Prismacolor pencils - ( or any type of pencils or copics)
Acetate - (I stamped the word SPECIAL on the acetate and then added patterned cardstock for background.
Clear Glitters


Thanks for visiting, hugs Jas♥

Wednesday, June 15, 2011

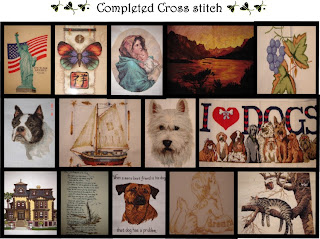
Cross Stitch Galore!

Hello,
      I just want to share the Completed Cross stitched that I made in the past. I learned how to Cross stitch in school way back when I was in elementary I remember. I had fun making these and very relaxing for me especially when you see the finished result. All of these that you're about to see are all sold out. It's been a while since I made the last one. The last one I made was the Viszla Dog when I was pregnant for the first time and after that I haven't get a chance to make another one. The only down side in this kind of craft it takes so long to finish. You need a ton of patience to be able to finish one, epecially the ones that I've been making they're not small size. But the good thing about this you only need thread, needle, Aida cloth and Pattern and you're all set.

Unlike scrapbooking you need so many things it never ends. But don't get me wrong I love to create cards, layouts and hopefully mini album. It's just sometimes, I get overwhelmed  of all the new things pretty much every week or month there's always a new stuff that is really cool. Which sometimes I cannot past not to buy, but I know that you don't need to have all the cool stuff in order to create one. I'm sure you know what I mean...

Hopefully, I get a chance to make another cross stitch and I will share it with you. =)

Here are some of the links on where I buy my patterns if you're interested: http://www.xs-collectibles.com/, http://www.crosstitch.com/animals.shtml (Some of the patterns I purchased it a long time ago so no longer available)

I hope you enjoy these cross stitched photos, hugs Jas
Here's my link to my Youtube video for a closer look: http://www.youtube.com/watch?v=nzkQnBehhkg&feature=channel_video_title


Tuesday, June 14, 2011

Father's day cards

Hey Everyone,
   
    I just want to share how I made these cards.The first card that I created is for my partner who is the love of my life.  I used AC  black cardstock, the size of the card is 9 1/2" x 4 1/4". I used TH Lost and Found patterned paper and used my sizzix to make the filmstrip frames (TH). The letters are from TH grungeboard, I embossed it with black embossing powder. I printed the pictures in B&W and cut them out to fit in the filmstrip die cut. Then I just adhere everything. The second one I made is for my dad. The size of the card is 5"x7",  I added some die cut belt from sizzix die and I stamped the letters and hand cut them and added some glossy accents. Also I used TH Hanging Sign die cut and dry embossed it. To create the buckel for the belt. I hope you enjoy these cards that I made. Advance Happy Father's day Honey, and to all the wonderful father's out there.

Card 1


Card 2

Saturday, June 11, 2011

Paypal

Hello Everyone,
    How was your weekend so far? I hope it's going the way you wanted to be. As of me, the usual busy. I just want to let you know that in this blog which I only have one blog anyway, lol! I will soon add some items that I sell on my etsy shop. So for those of you who wanted to buy some items and doesn't want to go on etsy, you will be able to purchase it here in my blog through PAYPAL. Can't wait to add my stuff here too! Enjoy your weekend!

Sunday, June 5, 2011

Because I'm The PRINCESS in 3D layout

Hello,
         Just here to share my 3D layout that I made "Because I'm The Princess". I made this for the Royal challenge on the Greeting Farm Blog, It's a Fairy Tale Fun. I thought I give a try to join the contest that they have there... I had fun making this at first it was complicated because I want the castle to stand. I was thinking if I do the easel card style it will stand but it's not as straight as I wanted to be. So I thought of pop-up style like the one you do on the card...but the castle that I made is a little heavy so it won't stand. So what I did was combined the two together so this is made with Easel & Pop-up, so I just named it a 3D layout.

         I used my cricut cartridge Wall Decor to make the castle and the stamped image is Cheeky Beauty from The Greeting Farm. I colored her with my prismacolor pencils and used some stickles to glitter her dress, garter hose and shoes. I made her look like she's sitting on a diamond but that's a swarovski crystals. The flowers are from Recollections and the red cardstock I made look like a red carpet and I used Martha S. punch for the edges and sprinkled it with perfect pearls to make it shimmery and I added some rhinestones as well. I used stamped image stars and used perfect pearls to make it sparkles. The only thing is it doesn't show in the photos and video clip all the sparkles that I put in this 3D layout.
                                                                              FRONT

CLOSE UP CASTLE

CLOSE UP CHEEKY BEAUTY

BACK

Visit my Youtube videos and don't forget to subscribe: craftgalore108 
I hope you enjoy and inspires you, hugs♥Jas.

Thursday, June 2, 2011

Handmade Shabby Chic Colors Paper Flowers

Hello Everyone,
      I'm so excited to introduce to all of you my latest paper flowers in shabby chic colors. So shimmery but for some reason the picture doesn't show it. =( Anyway, still you can see how beautiful they are and these will be available in my etsy store soon made to order. Hope you enjoy it!


Wednesday, June 1, 2011

Simple ways to store your Distress Inks/Color Chart

Hello Everyone,

I just wanted to share how I store my Distress Inks and also the color chart that I made. I printed this @ rangerink.com. What I did was printed it at white cardstock and the other one is Ivory Cardstock. The reason why I printed it twice because most of the paper flowers that I make I used White and Ivory/Manila Cardstock. It's a cool reference chart and also a good way to see what Distress Inks I already have. To make this cardstock sturdy, I adhere a medium chipboard for the backing. As soon as I have all the Distress Inks, I will laminate it to make sure it will last for a long time. I'm pretty sure I will be using this chart all the time. They provided all the color charts for each products that they carry so here's the link if you're interested: http://www.rangerink.com/labels.htm


Have a nice day!
Related Posts Plugin for WordPress, Blogger...